In This Article
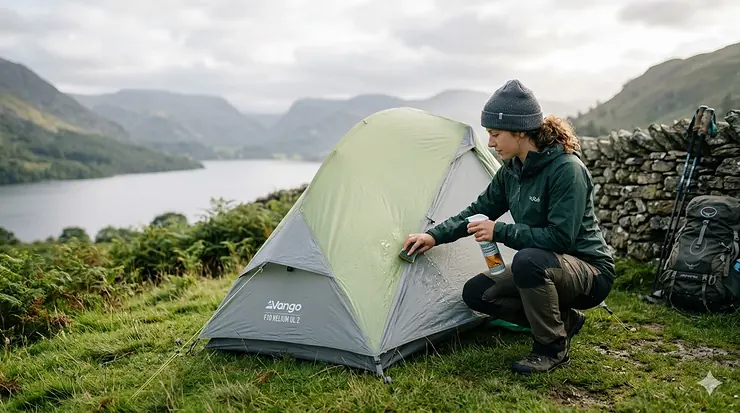
Picture this: you’ve spent months planning the perfect camping trip to the Lake District, invested in quality gear, and driven hours to reach your campsite. The forecast looked promising when you left home. Then, at 2 AM, you’re jolted awake by that unmistakable dripping sound. Water’s seeping through your tent seams, pooling on your sleeping bag, and suddenly your weekend adventure feels more like a survival challenge.
If you’ve experienced this nightmare scenario, you’re not alone. The unpredictable British weather can transform sunshine into torrential downpours within minutes, and even the best tents lose their waterproof coating over time. Learning how to waterproof your tent properly isn’t just about comfort—it’s about protecting your investment and ensuring safe, dry camping experiences for years to come.
Whether you’re a festival-goer, wild camper, or family holiday enthusiast, understanding tent waterproofing is essential. The good news? Reproofing your tent is surprisingly straightforward when you know the right techniques and products. In this comprehensive guide, we’ll walk you through everything from identifying when your tent needs attention to choosing the best waterproofing solutions available in the UK market today. By the time you finish reading, you’ll have the knowledge and confidence to tackle any leak, restore your tent’s protective barrier, and face the British weather with complete peace of mind.
Quick Comparison Table: Top Tent Waterproofing Products 2026
| Product | Type | Coverage | Price (£) | Best For | Rating |
|---|---|---|---|---|---|
| Nikwax Tent & Gear SolarProof | Spray | 50ml per m² | £18-£45 | UV protection + waterproofing | 4.3/5 |
| Fabsil Gold Universal Protector | Liquid/Spray | 15-18m² per litre | £30-£75 | Heavy-duty, long-lasting | 4.6/5 |
| Grangers Tent + Gear Repel UV | Spray | Standard coverage | £12-£25 | Eco-friendly option | 4.4/5 |
| Gear Aid Seam Grip FC | Seam sealer | 18m of seams | £8.99-£15.90 | Fast-curing seams | 4.5/5 |
| Fabsil Universal Protector 5L | Liquid | Up to 90m² | £46-£51 | Large tents, value | 4.7/5 |
| Dometic Seam Sealant | Seam sealer | 60ml tube | £8-£12 | Quick repairs | 4.2/5 |
| Out & About Multi-Purpose Spray | Aerosol | 2x300ml | £8-£12 | Budget option | 3.9/5 |
💬 Just one click – help others make better buying decisions too! 😊
Top 7 Tent Waterproofing Products: Expert Analysis
1. Nikwax Tent & Gear SolarProof – Premium UV Protection & Waterproofing
Nikwax Tent & Gear SolarProof stands as the gold standard for tent protection in the UK market, combining advanced waterproofing with crucial UV blocking technology. This water-based, non-aerosol spray delivers professional-grade results without harmful fluorocarbons.
Key Specifications:
- Coverage: Approximately 50ml per square metre
- Available in 500ml (£18-£22) and 2.5L (£35-£45) bottles
- Durable Water Repellent (DWR) technology
- Doubles fabric lifespan through UV protection
The standout feature here is the dual-action formula. Whilst most waterproofers simply repel moisture, Nikwax actively protects against ultraviolet degradation—the silent killer of tent fabrics. British campers report that tents treated with this product maintain water-beading performance even after exposure to our unpredictable summer mix of scorching sun and sudden showers.
UK customer feedback highlights exceptional performance on synthetic tents ranging from lightweight backpacking shelters to family-sized dome tents. One reviewer noted treating a 25-year-old tent that still repels severe Scottish Highland downpours. The spray-on application works on wet or dry fabric, saving valuable time during preparation.
✅ Pros:
- Environmentally friendly, water-based formula
- Excellent UV protection extends tent life significantly
- Works on wet or dry synthetic fabrics
- No harmful solvents or fluorocarbons
❌ Cons:
- Higher price point than basic alternatives
- Not suitable for silicone-coated fabrics
Price Range: £18-£45 | UK Availability: Widely available on Amazon.co.uk, outdoor retailers
2. Fabsil Gold Universal Protector – Heavy-Duty Waterproofing Champion
For campers who demand maximum protection, Fabsil Gold Universal Protector delivers unrivalled waterproofing performance. This super-concentrated silicone formula packs 2.5 times more active ingredients than standard Fabsil, making it ideal for tents facing prolonged exposure to harsh British weather.
Key Specifications:
- Coverage: 15-18 square metres per litre on lightweight nylon
- Available in 1L (£30), 5L (£75-£80) containers
- Silicone-based high-performance formula
- Paint-on or spray application options
Trusted by professionals and outdoor enthusiasts since 1963, Fabsil Gold has built an enviable reputation for keeping campers dry in even the most challenging conditions. The concentrated formula means you’re getting exceptional value, particularly with the 5-litre option for multiple tents or larger family shelters.
British customers consistently praise its effectiveness on bell tents, caravan awnings, and vintage camping gear. The product works brilliantly on canvas, cotton, polyester, and nylon, creating a robust waterproof barrier that withstands not just rain but also saltwater spray for coastal campers. Reviews from Scottish wild campers and Welsh mountain enthusiasts confirm it handles sustained heavy rainfall without breaking a sweat.
✅ Pros:
- Superior concentration provides excellent value
- Versatile application methods (paint or spray)
- Works on all fabric types
- Proven track record over decades
❌ Cons:
- Strong chemical odour during application (dissipates within days)
- Requires outdoor application with good ventilation
Price Range: £30-£80 | UK Availability: GO Outdoors, Amazon.co.uk, specialist camping shops
3. Grangers Tent + Gear Repel UV – The Eco-Conscious Choice
Grangers Tent + Gear Repel UV represents the perfect marriage of environmental responsibility and waterproofing performance. This British brand, established in 1937 and based in Derbyshire, leads the aftercare industry with its bluesign® approved, PFC-free formulations.
Key Specifications:
- Spray-on water-based treatment
- Available in 275ml (£12-£15) and 1L (£20-£25) bottles
- Includes UV protection technology
- Works best on damp fabric
The environmental credentials set Grangers apart in an industry often criticised for harsh chemicals. Their commitment to sustainable manufacturing doesn’t compromise effectiveness—this spray restores water-repellent finishes whilst protecting against staining and UV damage. The water-based formula means you can apply it knowing you’re not harming the environment or your respiratory system.
UK outdoor enthusiasts appreciate the straightforward application process. Simply ensure your tent is clean, dampen the fabric, shake well, and spray evenly from 15cm distance. Customer reviews highlight its effectiveness on everything from lightweight trekking tents to large family shelters. The UV protection is particularly valued by festival-goers whose tents endure days of summer sun exposure.
✅ Pros:
- Eco-friendly, bluesign® approved formula
- PFC-free for environmental safety
- Suitable for all outdoor gear fabrics
- Easy spray-on application
❌ Cons:
- Works best on damp fabric (requires pre-wetting)
- May need reapplication more frequently than silicone-based alternatives
Price Range: £12-£25 | UK Availability: Amazon.co.uk, Cotswold Outdoor, independent outdoor retailers
4. Gear Aid Seam Grip FC – Fast-Cure Seam Sealing Excellence
When it comes to sealing those vulnerable tent seams, Gear Aid Seam Grip FC (formerly Seam Sure) stands unmatched. This fast-curing, water-based sealant tackles the Achilles heel of tent waterproofing—the stitched seams where water loves to sneak through.
Key Specifications:
- 60ml tube seals up to 18 metres of seams
- Fast two-hour cure time
- Water-based urethane formula
- Dries to clear, flexible seal
Previously known as Seam Sure, this product has been reformulated for even better performance. The Seam Grip FC applies as a thin liquid that penetrates seam stitching before curing into a waterproof, flexible seal that won’t peel or crack. British campers particularly value the rapid cure time—treat your tent in the morning, and it’s ready for evening pitching.
Customer feedback from UK buyers emphasises reliability across all seasons. The urethane sealant remains effective in extreme temperatures, from summer heatwaves to winter cold snaps. Wild campers report treating lightweight trekking tents and seeing zero seam leakage during Lake District and Scottish Highland storms. The 60ml bottle provides excellent coverage for family-sized tents while remaining affordable.
✅ Pros:
- Fast two-hour curing time
- Unaffected by extreme temperatures
- Dries clear and flexible
- Long-lasting waterproof seal
❌ Cons:
- Only suitable for urethane-coated tents (not silicone)
- Smaller tube size may require multiple purchases for large tents
Price Range: £8.99-£15.90 | UK Availability: Amazon.co.uk, GO Outdoors, tackle shops
5. Fabsil Universal Protector 5 Litre – Best Value for Multiple Tents
For camping families, outdoor centres, or enthusiasts maintaining multiple tents, the Fabsil Universal Protector 5 Litre offers unbeatable value. This silicone-based powerhouse delivers professional-grade waterproofing at a fraction of the per-litre cost.
Key Specifications:
- 5-litre container treats up to 90 square metres
- Paint-on or spray application (use pump sprayer)
- Coverage: approximately 18m² per litre on lightweight nylon
- Suitable for synthetic and natural fabrics
The Fabsil 5L container represents serious economy for serious campers. Customer reviews reveal this single purchase can treat multiple tents, garden furniture, boat covers, and camping gear throughout the season. British buyers particularly appreciate the flexibility—decant into a spray bottle for quick application or use a paintbrush for controlled coverage on seams and high-wear areas.
UK campers consistently report exceptional results treating vintage canvas tents, modern polyester family tents, and everything in between. One reviewer transformed a four-year-old tent that had developed leaks during a wet Scottish weekend. After treatment, water literally rolled off the fabric during torrential rain. The longevity is impressive too—many users report going 18-24 months between applications even with regular use.
✅ Pros:
- Outstanding value for money per litre
- Treats multiple tents or large camping setups
- Versatile application methods
- Professional-grade results
❌ Cons:
- Large container requires proper storage
- May be excessive for single small tent owners
Price Range: £46-£51 | UK Availability: GO Outdoors, Amazon.co.uk, camping specialists
6. Dometic Seam Sealant – Quick Repair Specialist
Dometic Seam Sealant excels as an emergency repair solution and preventive maintenance product. This professional-grade sealant provides reliable waterproofing for seams on tents, awnings, and outdoor equipment with a user-friendly applicator nozzle.
Key Specifications:
- 60ml tube with precision applicator
- Colourless, flexible, washable formula
- Suitable for synthetic and natural fabrics
- Quick-drying formulation
The standout feature of Dometic seam sealant is the precision applicator nozzle, allowing controlled application exactly where needed. British campers value this when treating specific problem areas rather than entire seam runs. The colourless finish means it blends seamlessly with any tent colour, maintaining aesthetics whilst delivering waterproof performance.
Customer feedback highlights its effectiveness for both preventive treatment and emergency repairs. One UK reviewer successfully sealed leaking beam seams on a Vango Airbeam tent during a camping trip, with the sealant performing flawlessly in subsequent rainfall. The flexible formula moves with the fabric, preventing cracking that can occur with rigid sealants.
✅ Pros:
- Precision applicator for accurate application
- Dries colourless on any fabric colour
- Flexible and washable
- Suitable for on-site emergency repairs
❌ Cons:
- Smaller quantity than some competitors
- Higher per-ml cost
Price Range: £8-£12 | UK Availability: Aim Outdoors, Norwich Camping, outdoor retailers
7. Out & About Multi-Purpose Waterproof Spray – Budget-Friendly Protection
For cost-conscious campers or those testing waterproofing before investing in premium products, the Out & About Multi-Purpose Waterproof Spray twin pack offers accessible entry-level protection.
Key Specifications:
- Twin pack: 2×300ml aerosol cans
- Multi-purpose for tents, clothing, footwear
- Aerosol spray application
- Suitable for various outdoor fabrics
This Out & About offering won’t win awards for longevity or heavy-duty protection, but it delivers adequate waterproofing for occasional campers or emergency situations. The twin-pack format provides decent value, and the aerosol application makes treatment quick and straightforward.
UK customer reviews present mixed feedback. Positive experiences include successful treatment of new hiking jackets and trailer tents, with water beading nicely after application. However, some users report limited effectiveness on older, heavily worn fabrics or during sustained heavy rainfall. It appears best suited for light waterproofing maintenance rather than full reproofing of severely degraded tents.
✅ Pros:
- Very affordable twin pack
- Easy aerosol application
- Multi-purpose for various gear
- Good for light maintenance
❌ Cons:
- Less durable than silicone-based alternatives
- May require frequent reapplication
- Not ideal for severe weather conditions
Price Range: £8-£12 | UK Availability: Amazon.co.uk, budget outdoor retailers
✨ Don’t Miss These Exclusive Deals!
🔍 Take your camping experience to the next level with these carefully selected waterproofing products. Click on any highlighted item above to check current pricing and availability on Amazon.co.uk. These professional-grade treatments will help you create a bone-dry shelter your family can rely on, rain or shine!
Understanding Tent Waterproofing Technology
Before diving into the how-to waterproof process, understanding the science behind tent waterproofing helps you make informed decisions and achieve better results.
What Makes a Tent Waterproof?
Modern tents employ multiple waterproofing technologies working in harmony. The outer flysheet typically features a polyurethane (PU) or silicone coating applied to synthetic fabrics like polyester or nylon. Additionally, a Durable Water Repellent (DWR) finish sits on the fabric’s surface, causing water to bead and roll off rather than soaking in.
According to Wikipedia’s definition, the hydrostatic head measurement indicates a fabric’s waterproof capability—essentially how tall a column of water the material can support before leaking. Most UK tents feature flysheets rated between 2,000-5,000mm hydrostatic head, whilst groundsheets typically offer 5,000-10,000mm due to greater pressure from ground contact and occupants.
Why Waterproofing Deteriorates
Several factors conspire to degrade your tent’s waterproof protection over time. Ultraviolet radiation breaks down both the PU coating and DWR finish, particularly problematic during British summers when tents endure days of intense sun between rain showers. Dirt, pollen, and environmental grime accumulate on the fabric surface, disrupting the DWR’s water-repelling properties. Physical abrasion from packing, unpacking, and general use gradually wears away protective coatings.
The PU coating on the inside of many tent fabrics can also hydrolyse—a chemical breakdown triggered by moisture and heat that manifests as sticky, flaking residue. Once this process starts, the waterproof barrier becomes compromised, and water penetration is inevitable.
The Role of Seam Sealing
Even with perfectly waterproof fabric, your tent remains vulnerable at the seams. Every stitch creates a tiny hole where water can penetrate. Manufacturers typically seal these seams with tape or liquid sealant, but this protection wears away faster than the fabric coating itself. That’s why learning how to waterproof tent seams forms a crucial part of any maintenance routine.
How to Check If Your Tent Needs Waterproofing
Identifying when your tent requires reproofing prevents unpleasant surprises on camping trips. Here’s how to assess your tent’s current waterproof status.
The Water Spray Test
Pitch your tent in the garden or another open area on a dry day. Using a garden hose or spray bottle, gently spray water across the flysheet fabric. Observe the water’s behaviour carefully. If droplets bead up and roll off the surface, your tent’s waterproofing remains intact. However, if water soaks into the fabric, creating dark patches or a continuous film, your tent definitely needs reproofing.
Visual Inspection for Coating Breakdown
Examine the inside of your flysheet and tent floor for telltale signs of coating failure. Flaking, peeling, or sticky residue on the interior surface indicates polyurethane coating breakdown. Check seams for separation, cracking, or visible gaps where the waterproof tape has lifted. Any of these symptoms demand immediate attention.
Post-Trip Assessment
After camping in wet conditions, inspect your tent carefully before packing it away. Note any areas where moisture penetrated—common problem zones include seams, stress points around pole sleeves, and the tent floor. Dampness appearing from inside during the trip might indicate coating failure rather than external leaks.
Recommended Reproofing Schedule
As a general guideline, plan to reproof your tent every 12-24 months depending on usage intensity. Tents used for three weeks annually benefit from biennial treatment, whilst frequent wild campers should inspect and reproof seasonally. Always reproof after prolonged UV exposure, coastal camping (salt accelerates degradation), or if the tent has been stored damp.
Before heading out on any camping trip, the Met Office recommends checking weather forecasts and warnings to ensure your tent is prepared for the conditions you’ll face. Their camping-specific advice highlights that tents designed to withstand light rain may struggle with sustained downpours, making proper waterproofing essential.
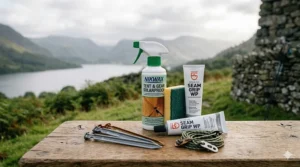
Essential Preparation: Cleaning Your Tent Before Waterproofing
Proper cleaning forms the foundation of effective waterproofing. Dirt, oils, and residues prevent waterproofing products from bonding correctly with tent fabric, so thorough preparation is non-negotiable.
Why Cleaning Matters
Think of waterproofing products as microscopic shields that need direct contact with tent fibres to work effectively. Dirt, mud, tree sap, and body oils create barriers preventing proper adhesion. Even invisible contamination—pollen, air pollution, or dried condensation residues—can significantly reduce waterproofing effectiveness.
Step-by-Step Tent Cleaning Process
Step 1: Choose Your Location Set up your tent fully erected in a garden, driveway, or other outdoor space with good drainage. An erected tent allows you to access all surfaces easily and ensures the fabric is taut for thorough cleaning.
Step 2: Remove Loose Debris Shake out the tent to dislodge loose dirt, leaves, and debris. Use a soft brush to gently remove stubborn mud patches, particularly from the groundsheet and around pole sleeves. Avoid aggressive scrubbing that might damage fabric or coatings.
Step 3: Apply Cleaning Solution Use a specialist tent cleaner like Fabsil Tent + Gear Cleaner or a mild, fragrance-free washing-up liquid diluted in warm water. Apply with a soft sponge or cloth, working in gentle circular motions. Pay particular attention to seams, zips, and areas showing visible soiling.
Step 4: Rinse Thoroughly Rinse the tent completely using a garden hose with gentle pressure. Ensure all soap residue is removed—soap traces interfere with waterproofing product adhesion. Keep rinsing until water runs completely clear without any foam or suds.
Step 5: Dry Completely Allow your tent to dry fully before applying waterproofing treatments. This typically takes 24-48 hours depending on weather conditions. Leave the tent pitched in a shaded, well-ventilated area—avoid direct intense sunlight during drying as this can cause fabric stress. The tent must be bone dry; even slight dampness can prevent waterproofers from curing properly.
Special Considerations for Different Tent Types
Polycotton and canvas tents require gentler cleaning to avoid damaging natural fibres. Use specialist canvas cleaners and lukewarm (not hot) water. Synthetic tents tolerate more vigorous cleaning but avoid harsh detergents or bleach-based products that attack waterproof coatings.
How to Waterproof Tent Fabric: Complete Application Guide
Now your tent is spotlessly clean and dry, it’s time to restore that crucial waterproof protection. This section covers the complete application process for fabric waterproofing products.
Choosing Between Spray and Liquid Waterproofers
Both application methods deliver excellent results when used correctly, each with distinct advantages. Spray-on waterproofers like Nikwax Tent & Gear SolarProof or Grangers Tent + Gear Repel UV offer convenience and speed, particularly for large tent surfaces. The fine mist provides even coverage and reaches difficult areas easily.
Liquid paint-on treatments such as Fabsil Gold Universal Protector give you more control, particularly useful for concentrating product on high-wear areas like seams and pole contact points. They’re also more economical for treating multiple tents or large surface areas.
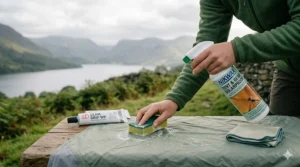
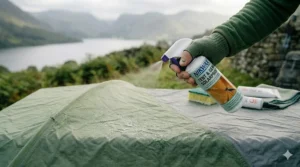
Step-by-Step Spray Application
Step 1: Prepare Your Work Area Work outdoors or in an extremely well-ventilated space like an open garage. Protect surrounding surfaces with tarpaulins or dust sheets. Wear a face mask to avoid inhaling spray mist, even with water-based products.
Step 2: Shake and Test Shake the waterproofing product thoroughly according to manufacturer instructions. Test spray on a small, inconspicuous area to ensure even distribution and appropriate spray pattern.
Step 3: Apply Systematically Hold the spray 15-20cm from the tent surface and apply in smooth, even sweeps. Work methodically from top to bottom, ensuring complete coverage without oversaturation. Overlap each spray pass slightly to avoid missing strips.
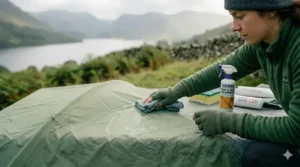
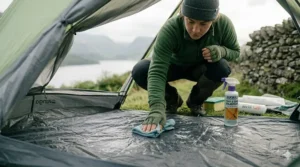
Step 4: Address High-Wear Areas Pay extra attention to seams, stress points around pole sleeves, and the tent floor. These areas benefit from slightly heavier application, but avoid pooling or runoff.
Step 5: Remove Excess After 2-3 minutes, use a clean, damp cloth to wipe away any drips, runs, or pooled product. This prevents uneven curing and maintains a consistent waterproof barrier.
Step-by-Step Liquid Application
Step 1: Prepare Application Tools Use a clean paintbrush (50-75mm width works well), foam applicator pad, or spray bottle (for diluted products). Ensure tools are completely clean and free from paint, varnish, or other contaminants.
Step 2: Apply Evenly Dip your brush or applicator in the waterproofing liquid and apply in long, even strokes following the fabric weave direction. Maintain consistent pressure to avoid thick and thin patches.
Step 3: Work in Sections Divide your tent into manageable sections (quarter panels, for instance) and complete each fully before moving on. This ensures thorough coverage and prevents accidentally missing areas.
Step 4: Avoid Over-Application The goal is saturation without soaking. The fabric should appear evenly damp but not dripping. Excess product doesn’t improve waterproofing and wastes expensive materials.
Drying and Curing Time
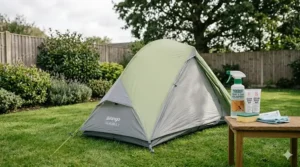
Proper curing is absolutely critical for maximum waterproofing effectiveness. Leave your tent pitched in a sheltered outdoor area (or well-ventilated indoor space) allowing air circulation on all surfaces. Most products require 24-48 hours for complete curing, though initial drying may occur within 4-6 hours.
Avoid the temptation to accelerate drying with heat guns or direct intense sunlight—this can compromise the waterproof coating’s integrity. Natural air drying produces the best results. Don’t pack your tent away until completely dry to the touch on all surfaces.
How to Seal Tent Seams: Professional Techniques
Seam sealing often makes the difference between a dry tent and a leaky nightmare. Here’s how to tackle this crucial maintenance task like a professional.
Understanding Seam Construction
Tent seams come in several configurations. Lap-felled seams overlap fabric layers before stitching, whilst flat-felled seams fold and stitch edges together. Factory-sealed seams feature heat-bonded tape covering the stitching, whilst some budget tents arrive with unsealed seams requiring immediate treatment.
Selecting the Right Seam Sealer
Match your sealer to your tent’s coating type for optimal adhesion. Polyurethane-coated tents (the majority of UK market tents) require urethane-based sealers like Gear Aid Seam Grip FC. Silicone-coated tents need silicone-specific sealers—using the wrong type results in poor adhesion and eventual failure.
Preparing Seams for Treatment
Turn your flysheet inside-out and pitch it (or lay flat over a clean tarpaulin). The sealant gets applied to the interior seam surface where stitching penetrates the fabric. Carefully clean seams with rubbing alcohol and a lint-free cloth, removing any old sealant residue, dirt, or oils. Allow the alcohol to evaporate completely before proceeding.
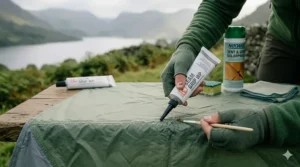
Application Technique
Step 1: Squeeze a Thin Bead Apply seam sealer in a continuous, thin bead directly along the seam line. The sealant should cover the stitching holes completely whilst extending 2-3mm either side.
Step 2: Smooth and Spread Using a foam brush or your finger (wear disposable gloves), gently smooth the sealant into an even coating. Press firmly to ensure it penetrates all stitch holes without leaving thick ridges that can crack.
Step 3: Check for Gaps Inspect your work carefully under good lighting, looking for any missed spots, thin patches, or gaps. Add additional sealant to problem areas immediately.
Step 4: Allow Proper Cure Time Most modern seam sealers cure within 2-24 hours depending on formulation. Gear Aid Seam Grip FC achieves handling strength in just two hours, though full cure takes longer. Avoid stressing seams until completely cured.
Special Attention Areas
Focus particularly on high-stress seams where water pressure builds up—ridge seams, door zips, and floor-to-wall junctions. These areas benefit from slightly more generous sealant application. Don’t forget groundsheet seams if your tent floor shows signs of seepage.
Advanced Waterproofing: Floor and Groundsheet Treatment
The tent floor endures more punishment than any other component—ground moisture, body pressure, equipment weight, and abrasive surfaces all conspire to degrade waterproofing faster than the flysheet.
Assessing Floor Condition
Groundsheet waterproofing typically features higher hydrostatic head ratings (often 5,000-10,000mm) than flysheets because of the greater pressure applied. However, this coating still deteriorates, particularly in tents used on rough or abrasive ground.
Check for coating breakdown by examining the inside floor surface. Stickiness, flaking, or a tacky texture indicates polyurethane coating hydrolysis. Even without visible deterioration, if moisture appears inside the tent floor during camping, treatment is overdue.
Floor-Specific Waterproofing Products
Some manufacturers produce floor-specific sealants with enhanced durability for ground contact applications. However, general-purpose waterproofing products like Fabsil Universal Protector work excellently on groundsheets when applied generously.
Application Process
Flip your tent inside-out and lay the floor completely flat over a clean surface. This allows gravity to help the waterproofing product penetrate evenly. Clean the floor thoroughly—dirt and grime adhere more stubbornly to groundsheets than flysheets due to ground contact.
Apply waterproofing product more generously to floors than flysheets. The fabric should appear saturated but not pooling. Pay particular attention to high-wear areas where equipment presses against the floor and seams where ground moisture typically penetrates.
Allow extended drying time for floor treatments—48-72 hours ensures complete curing. The thicker application takes longer to cure fully, but patience rewards you with significantly improved waterproof performance.
Using a Footprint for Extended Protection
Whilst not strictly waterproofing, using a groundsheet footprint (a protective barrier placed under your tent) dramatically extends floor waterproofing by preventing direct contact with abrasive surfaces and ground moisture. This simple addition can double or triple the time between floor reproofing sessions.
Waterproofing Different Tent Fabrics: Polyester, Nylon, Canvas & Polycotton
Different tent fabrics require specific waterproofing approaches for optimal results. Understanding your tent’s material composition ensures you select appropriate products and techniques.
Polyester Tents
Polyester dominates the UK tent market for family camping and festival tents. This synthetic fabric accepts both silicone and polyurethane-based waterproofers readily. Products like Nikwax Tent & Gear SolarProof and Fabsil Gold work superbly on polyester, providing long-lasting protection.
Polyester’s primary waterproofing challenge comes from UV degradation. British weather creates a unique problem—tents experience intense summer UV exposure followed immediately by rain, accelerating coating breakdown. Always choose UV-protective waterproofing products for polyester tents.
Nylon Tents
Lightweight backpacking and trekking tents typically use nylon for its excellent strength-to-weight ratio. Nylon’s smoother surface holds DWR coatings well but can be slippery during application. Spray-on products often work better than paint-on for even coverage.
Nylon stretches more than polyester when wet, so waterproofing products must remain flexible after curing. Silicone-based treatments like Fabsil maintain flexibility better than some rigid polyurethane coatings.
Canvas and Polycotton Tents
Traditional canvas and modern polycotton blend tents use entirely different waterproofing mechanisms than synthetic materials. Natural cotton fibres swell when wet, closing gaps in the weave to create a waterproof barrier—a process called “weathering.”
New canvas tents require initial weathering: pitch the tent and thoroughly soak it with water, allowing it to dry completely. Repeat this process 2-3 times to activate the fibres’ natural waterproofing properties.
For reproofing aged canvas, use products specifically formulated for natural fibres like Fabsil Cotton Proof (different from the Universal Protector). Canvas waterproofing products typically contain wax or specialised polymers that bond with cotton fibres without preventing breathability.
Apply canvas waterproofing more sparingly than synthetic treatments—over-application can make the fabric stiff and reduce breathability. Work the product into the weave using circular motions with a brush or sponge, ensuring even penetration.
Common Tent Waterproofing Mistakes to Avoid
Learning from others’ mistakes saves time, money, and camping disappointment. Here are the most common waterproofing errors and how to avoid them.
Whether you’re camping on official campsites or practising responsible wild camping (where permitted), maintaining proper tent waterproofing is essential. For guidance on outdoor access and responsible camping practices across the UK, consult the Countryside Code for England and Wales or the Scottish Outdoor Access Code for Scotland.
Mistake 1: Skipping the Cleaning Stage
Applying waterproofing products to dirty tents is the single most frequent error. The waterproofer can’t bond properly with contaminated fabric, resulting in patchy protection that fails during the first rainfall. Always clean thoroughly and allow complete drying before waterproofing.
Mistake 2: Using Incorrect Products for Fabric Type
Applying silicone sealer to polyurethane-coated seams (or vice versa) creates adhesion problems that manifest as peeling, cracking, or complete failure. Check your tent’s specifications or contact the manufacturer to confirm coating type before purchasing sealants.
Mistake 3: Over-Application
More waterproofing product doesn’t equal better protection. Excessive application creates thick, inflexible coatings that crack under stress and can actually reduce breathability, increasing condensation problems. Follow manufacturer guidelines for coverage rates precisely.
Mistake 4: Insufficient Drying Time
Rushing the curing process by packing away a partially dried tent traps solvents and moisture, preventing proper waterproofing development. Worse, it can create sticky messes and musty odours. Always allow full recommended drying time, even if it delays your camping plans.
Mistake 5: Neglecting Seam Preparation
Attempting to seal over old, degraded seam tape or flaking sealant creates an unstable base for new application. Take time to carefully remove all old material and clean seams thoroughly with alcohol before applying fresh sealant.
Mistake 6: Indoor Application Without Ventilation
Waterproofing products, even water-based formulations, release fumes during application and curing. Working in enclosed spaces without adequate ventilation can cause headaches, dizziness, or respiratory irritation. Always work outdoors or in spaces with excellent air circulation.
UK fire services emphasise campsite safety, including proper ventilation when using chemical products. For comprehensive camping safety guidelines, including fire prevention and emergency preparedness, visit your local fire service website or consult resources from organisations like Derbyshire Fire & Rescue Service’s camping safety advice.
Maintaining Your Tent’s Waterproofing Between Treatments
Proper maintenance extends the intervals between full reproofing sessions, saving time and money whilst ensuring reliable protection.
Post-Trip Care
Never pack away a wet tent. Moisture trapped in storage creates perfect conditions for mould growth and accelerates coating hydrolysis. If you must pack a damp tent (breaking camp in rain, for instance), unpack and dry it completely within 24 hours.
Shake out dirt, leaves, and debris before packing. Brush off mud from the groundsheet whilst still slightly damp—dried mud adheres stubbornly and requires aggressive cleaning that can damage coatings.
Proper Storage Practices
Store tents in cool, dry locations away from direct sunlight and heat sources. UV exposure continues degrading coatings even during storage. Avoid damp basements or hot attics—aim for stable, moderate temperatures.
Store tents loosely rather than compressing them tightly for extended periods. Permanent compression can stress waterproof coatings and create weak points. If space allows, hang tents loosely or store in large breathable bags.
Quick Refresh Treatments
Between full reproofing sessions, apply light maintenance coats to high-wear areas like seams, door surrounds, and pole contact points. This spot treatment extends overall waterproofing effectiveness without requiring full tent treatment.
Keep a small bottle of spray waterproofer and seam sealer in your camping kit for emergency repairs. A quick application to a developing leak can salvage a camping trip and prevent more extensive damage.
Pitch Periodically During Storage
If possible, pitch your tent once or twice during long storage periods. This allows fabric to relax, identifies developing problems early, and provides opportunities for spot treatments before issues become serious.
The Camping and Caravanning Club, the UK’s oldest and largest camping organisation, emphasises the importance of regular tent maintenance and proper storage to maximise equipment lifespan and ensure safety on camping trips.
FAQ: Tent Waterproofing Questions Answered
❓ How often should you waterproof a tent in the UK?
❓ Can you waterproof a tent while it's wet?
❓ What's the best tent waterproofing spray available in the UK?
❓ How long does tent waterproofing take to dry?
❓ Do all tent seams need sealing from new?
Conclusion: Mastering Tent Waterproofing for British Weather
Learning how to waterproof your tent properly transforms camping from a gamble against British weather into a reliably dry, comfortable experience. The investment of a few hours and £20-50 in quality waterproofing products protects camping gear worth hundreds of pounds whilst ensuring peace of mind during unpredictable weather.
Remember the key principles: thorough cleaning forms the foundation of effective waterproofing; matching products to your tent’s specific fabric type ensures optimal adhesion and longevity; proper application technique and adequate curing time determine long-term performance. Don’t neglect seam sealing—it’s often the difference between staying dry and experiencing miserable leaks.
Whether you’ve chosen the premium UV protection of Nikwax Tent & Gear SolarProof, the concentrated power of Fabsil Gold Universal Protector, or the eco-friendly credentials of Grangers Tent + Gear Repel UV, consistent maintenance keeps your tent performing like new season after season. Inspect regularly, address problems promptly, and never pack away wet tents.
The British weather will continue throwing sunshine, showers, and everything between at your camping adventures. With properly waterproofed tents and the knowledge to maintain them, you’ll face every forecast with confidence. Your next camping trip awaits—make sure your shelter is ready for whatever the skies deliver.
For planning your next outdoor adventure with confidence, Ordnance Survey provides excellent mapping resources, route planning tools, and expert advice on wild camping locations across Britain.
Recommended for You
- 7 Best Kampa Tent Models for UK Families 2026
- 7 Best Outwell Tent Options for UK Families 2026
- 7 Best Geodesic Tents UK 2026
Disclaimer: This article contains affiliate links. If you purchase products through these links, we may earn a small commission at no additional cost to you. Prices shown are approximate and may vary.
✨ Found this helpful? Share it with your mates! 💬🤗