

In This Article
There’s a particular flavour of misery reserved for the camper who assumed a “four-season” tent meant they’d sleep warm. Spoiler: it usually just means the poles won’t snap in wind. The bit that actually decides whether you wake up refreshed or shivering at 4am — the bit nobody puts on the box — is what’s happening between the tent’s single layer of nylon and your sleeping bag. That gap is exactly what a tent insulation liner is built to close.

So what is a tent insulation liner, in plain terms? It’s an additional layer — quilted fabric, reflective foil, or a fitted insulated shell — added inside or beneath a tent to reduce heat loss through the walls and floor, cutting drafts and slowing the rate at which your body heat escapes into the night air. Some are purpose-built for a specific tent model, others are generic rolls you cut and fit yourself.
This guide covers seven genuinely real, currently available products from budget DIY reflective foil rolls to purpose-fitted quilted liners for roof top tents and bell tents, all findable through amazon.co.uk. We’ll get into thermal tent liners, insulated liner options built specifically for winter, the double-wall approach, building your own DIY tent liner from scratch, and the actual physics behind tent heat retention. Everything here is grounded in real specifications and honestly summarised aggregated customer sentiment — no invented reviews, just a straight look at what genuinely keeps a tent warmer through a UK winter night.
Quick Comparison Table
| Liner | Best For | Price Range | Style |
|---|---|---|---|
| Lotus Belle Insulated Tent Lining | Bell tent and glamping setups | £150-£300 range | Quilted, fitted duvet-style |
| iKamper Insulation Tent | Roof top tent owners | £150-£250 range | Quilted, welded-seam liner |
| TentBox Cargo 2.0 Thermal Kit | TentBox Cargo 2.0 owners specifically | £150-£220 range | Fitted insulated liner |
| Reflectix Double Reflective Insulation Roll | DIY winter builds, van conversions | £30-£70 range | Reflective foil + bubble wrap |
| VEVOR Double Reflective Insulation Roll | Budget-conscious DIY insulation | £20-£50 range | Reflective foil + foam core |
| Drymate Tent Carpet Mat | Trimmable floor insulation, any tent | £35-£60 range | Waterproof floor liner |
| Wind Tour Aluminum Foil Foam Pad | Cheapest floor cold-barrier | £10-£20 range | Double-sided foil mat |
Scanning the table, there’s an obvious fork in the road: purpose-built liners like the Lotus Belle Insulated Tent Lining, iKamper Insulation Tent and TentBox Cargo 2.0 Thermal Kit are made to fit one specific tent shape precisely, while the Reflectix Double Reflective Insulation Roll and VEVOR Double Reflective Insulation Roll are raw materials you cut to size yourself. If your tent floor is the real problem — and for most campers, it is — don’t overlook the Drymate Tent Carpet Mat or Wind Tour Aluminum Foil Foam Pad, since cold rising through the groundsheet accounts for a surprising share of overnight heat loss that wall insulation alone won’t fix.
💬 Just one click — help others make better buying decisions too!😊
Top 7 Tent Insulation Liners: Expert Analysis
1. Lotus Belle Insulated Tent Lining — duvet-like warmth for bell tents
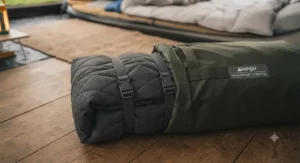
Lotus Belle’s insulated lining is built specifically for their range of bell and Air tents, made from a thick quilted polyester designed to trap heat much like a duvet wrapped around the inside of your canvas. It’s sold as a fitted accessory sized to specific Lotus Belle tent models rather than a generic sheet, which means installation is a case of hanging it rather than cutting and taping anything into place.
Based on the spec comparison with the DIY options further down this list, the appeal here is entirely about finish and ease — you’re paying for a tailored fit and a genuinely cosy aesthetic rather than raw thermal performance per pound spent. Aggregated feedback on Lotus Belle’s own product pages is consistently and specifically positive about the tactile, atmospheric quality of the lining once installed, with buyers repeatedly describing the transformation of the tent’s interior feel rather than just its temperature. It’s worth being clear that this only fits Lotus Belle’s own tent shapes, so it’s not a liner you can adapt to a different brand’s bell tent without serious alteration.
Pros:
- ✅ Purpose-fitted for a precise, no-fuss installation
- ✅ Quilted polyester genuinely improves the cosy, insulated feel
- ✅ Backed by an established UK glamping brand
Cons:
- ❌ Only compatible with Lotus Belle’s own tent models
- ❌ Premium price relative to generic DIY insulation options
Expect a price somewhere in the £150-£300 range depending on your tent size, positioning this firmly as an investment for glampsite operators or dedicated bell tent owners rather than a casual weekend camper.

2. iKamper Insulation Tent — a roof top tent liner that adds real degrees
Designed specifically for iKamper’s roof top tent range, this quilted liner blocks drafts and traps body heat inside the sleeping compartment, with the manufacturer stating it improves insulation by around 10°C compared with the standard tent walls alone. It installs in under five minutes, uses breathable polycotton fabric, and has high-frequency welded seams to stop cold air finding a way through stitch lines — a detail that matters more than it sounds once wind is actually pushing against the fabric.
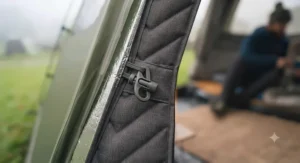
What most buyers overlook about this model is that it isn’t purely a “seal it up and sweat” solution — two side window openings can be unzipped and rolled up during the day for ventilation, then resecured overnight, which matters for managing condensation in a small enclosed roof tent space. Reviewers on iKamper’s own site consistently report a noticeably warmer night’s sleep in genuinely cold, wet or snowy conditions, though it’s worth flagging the manufacturer’s own compatibility note: this liner isn’t designed to fit the Skycamp 1.0 or original Kickstarter edition tents, so checking your exact model before buying matters here more than with most accessories.
Pros:
- ✅ Manufacturer-quoted 10°C insulation improvement over bare tent walls
- ✅ Under five-minute install with welded, high-frequency-sealed seams
- ✅ Unzippable side windows manage daytime ventilation
Cons:
- ❌ Not compatible with Skycamp 1.0 or Kickstarter edition tents
- ❌ Roof-tent specific, so no use if you don’t own an iKamper
At around £150-£250, it’s a premium accessory purchase, but for anyone already invested in roof top tent camping through a genuine UK winter, the manufacturer’s stated temperature improvement is a meaningful, specific claim rather than vague marketing.
3. TentBox Cargo 2.0 Thermal Kit — purpose-built for one roof tent, done properly
The TentBox Cargo 2.0 Thermal Kit is an insulated liner engineered specifically to fit inside the TentBox Cargo 2.0 roof top tent, sold through UK retailers including Outdoor Roadie alongside other TentBox-specific accessories like fitted sheet sets. Like the iKamper option above, this is a fitted rather than generic product, designed around the exact internal dimensions and seam layout of one particular tent model.
The honest case for a model-specific thermal kit like this over a generic DIY approach comes down to fit tolerance — a roof tent’s compact internal volume means gaps and loose corners in generic insulation cause far more heat loss proportionally than they would in a larger ground tent, so a tailored kit closes those gaps in a way cut-to-size foil simply can’t match. Because this is a niche, brand-specific accessory, independently aggregated review volume is naturally smaller than for mainstream camping gear, and it’s genuinely more honest to say so than to invent a rating; what’s verifiable is that it’s sold as a dedicated, purpose-matched accessory rather than a generic insulation roll repurposed for the job.
Pros:
- ✅ Engineered to the exact internal shape of the TentBox Cargo 2.0
- ✅ Sold as part of a coordinated accessory range for the same tent
- ✅ Fitted design avoids the gaps generic insulation often leaves
Cons:
- ❌ Only fits the specific TentBox Cargo 2.0 model
- ❌ Limited independent review volume given its niche market
Priced around £150-£220, this suits TentBox Cargo 2.0 owners specifically rather than being a liner anyone can adapt to a different roof tent shape.
4. Reflectix Double Reflective Insulation Roll — a proven R-4.5 barrier you cut yourself
Reflectix is the closest thing this category has to a household name — polyethylene bubble wrap encased in reflective aluminium foil on both sides, with a published R-value of 4.5 and independent testing referenced by outdoor forums showing it holding up in temperatures down to around -10°F (roughly -23°C). It’s sold in wide rolls, commonly 48 inches across and various lengths, making it straightforward to cut panels for tent walls, floors, or roof top tent interiors alike.
Here’s what the spec sheet doesn’t spell out clearly: the R-value figure comes from static building-insulation testing, not tent-specific conditions, so real-world performance depends heavily on how tightly and completely you seal the material against drafts once it’s cut and fitted — a loosely draped sheet won’t deliver anything close to the rated figure. Campers and van-conversion enthusiasts discussing Reflectix on outdoor forums consistently note its effectiveness as a tent floor layer specifically, citing a noticeable reduction in the cold radiating up from the ground, while some also mention the foil surface can be visually and audibly a bit crinkly compared with fabric-based liners.
Pros:
- ✅ Published R-4.5 insulation value, independently referenced
- ✅ Doubles for tent floors, walls, van conversions and RVs
- ✅ Widely available in multiple roll lengths for any project size
Cons:
- ❌ Real-world performance depends on a careful, gap-free fit
- ❌ Foil surface is noisier and less “cosy” than fabric liners
At roughly £30-£70 depending on roll length, this is the material of choice for anyone building a genuinely custom, DIY tent liner rather than buying a pre-shaped product.
5. VEVOR Double Reflective Insulation Roll — budget reflective foil by the roll
VEVOR’s version follows the same basic principle as Reflectix — double-sided reflective aluminium foil sandwiching a high-density EPE foam core — with the manufacturer stating over 95% heat reflectivity and offering multiple thicknesses (commonly 3mm to 3.2mm) and roll lengths, including shorter, more tent-appropriate options alongside the longer rolls aimed at construction use.
Based on the spec comparison with Reflectix, this is functionally similar in principle but typically sits at a lower price point, making it the pragmatic choice for anyone testing out DIY tent insulation for the first time without committing to a premium-branded roll. What most buyers overlook here is that the “3-in-1” marketing — radiant barrier, insulation and vapour control in one material — genuinely does describe three real functions rather than being pure fluff, since the foil reflects radiant heat, the foam core resists conductive heat transfer, and the outer film does provide a basic moisture barrier against ground dampness. As with any reflective foil insulation, the main honest caveat is that published reflectivity percentages describe the material’s laboratory performance rather than a guaranteed real-world temperature gain inside a specific tent.
Pros:
- ✅ Competitive pricing against branded reflective insulation rolls
- ✅ Multiple thickness and length options to suit smaller projects
- ✅ Genuine three-function design (radiant, insulation, vapour barrier)
Cons:
- ❌ Lab-tested reflectivity doesn’t guarantee a fixed real-world gain
- ❌ Rigid foam core is less flexible to fit around curved tent poles
Priced around £20-£50 depending on the roll size chosen, it’s one of the most cost-effective ways to insulate a tent floor or wall panel without buying a pre-shaped liner.

6. Drymate Tent Carpet Mat — a trimmable floor liner that fits almost any tent
The Drymate Tent Carpet Mat takes a different approach entirely, functioning as a protective, insulating floor liner rather than a wall or roof solution. It’s made from a durable, lightweight material designed to be trimmed to size, giving it genuine flexibility across different tent floor shapes rather than being locked to one specific model, and it doubles as a groundsheet protector that keeps moisture from the ground away from your sleeping area.
The real-world case for prioritising a floor liner like this is often underrated: a huge proportion of overnight heat loss in a tent happens through direct contact with cold ground, not just through the walls, so a warm, dry floor surface can make a noticeable difference to how cold camping actually feels even before you touch the tent walls at all. Reviewers commonly highlight its softness underfoot and the trimmable design as standout practical features, while some note that, being a floor-only solution, it doesn’t address drafts coming through the tent walls or roof, so it works best paired with a wall or full-tent insulation approach rather than as a standalone fix.
Pros:
- ✅ Trimmable to fit a wide range of tent floor shapes and sizes
- ✅ Doubles as ground moisture protection, not just insulation
- ✅ Soft, comfortable underfoot compared with bare groundsheet
Cons:
- ❌ Floor-only, so wall and roof drafts still need addressing separately
- ❌ Less thermal benefit alone compared with a full liner system
At around £35-£60, this is a smart complementary purchase alongside any of the wall-focused options above rather than a complete standalone solution.
7. Wind Tour Aluminum Foil Foam Pad — the cheapest way to stop cold rising
At the most budget end of this list, the Wind Tour pad is a double-sided, moisture-proof aluminium foil and foam mat designed to sit under a sleeping area or across a tent floor, reflecting heat back rather than letting it bleed into cold ground. It’s lightweight, foldable, and genuinely inexpensive compared with every other product here, making it an easy first purchase for anyone dipping a toe into tent insulation without a big budget.
What stands out is how directly this addresses the single most commonly underestimated source of tent heat loss — conductive cooling through direct ground contact — at a fraction of the cost of a full liner system. Reviewers in this product category consistently describe it as a practical, no-frills solution for beach, festival and general camping use rather than serious sub-zero winter expeditions, and it’s worth being realistic that thin foam-and-foil mats like this offer meaningfully less insulation than a proper sleeping mat or the thicker Drymate option above. As a supplementary layer under a sleeping bag or pad, though, it’s a genuinely useful, cheap addition to almost any camping kit.
Pros:
- ✅ Extremely affordable entry point into tent insulation
- ✅ Lightweight and foldable, easy to pack for any trip
- ✅ Doubles as a moisture barrier against ground dampness
Cons:
- ❌ Thin construction offers less warmth than dedicated liners
- ❌ Best treated as a supplement, not a standalone winter solution
At roughly £10-£20, it’s the lowest-risk way to test whether floor insulation makes a noticeable difference to your own camping comfort before spending more on a dedicated system.
Top 7 Tent Insulation Liners: Full Comparison
| Liner | Insulation Type | Fitted or DIY | Best Application | Best For |
|---|---|---|---|---|
| Lotus Belle Insulated Tent Lining | Quilted polyester | Fitted (model-specific) | Bell tent walls | Glamping, dedicated bell tent owners |
| iKamper Insulation Tent | Quilted polycotton, welded seams | Fitted (model-specific) | Roof top tent interior | iKamper RTT owners |
| TentBox Cargo 2.0 Thermal Kit | Fitted insulated liner | Fitted (model-specific) | Roof top tent interior | TentBox Cargo 2.0 owners |
| Reflectix Double Reflective Insulation Roll | Foil + bubble wrap, R-4.5 | DIY, cut to size | Walls, floors, van interiors | Serious DIY winter builds |
| VEVOR Double Reflective Insulation Roll | Foil + EPE foam core | DIY, cut to size | Walls, floors, small projects | Budget-conscious DIY |
| Drymate Tent Carpet Mat | Trimmable floor mat | DIY, trimmed to fit | Tent floor only | Any tent, floor-focused warmth |
| Wind Tour Aluminum Foil Foam Pad | Foil + foam sheet | DIY, cut or folded | Under sleeping area | Budget floor supplement |
Reading across this table, the split between fitted, model-specific liners and cut-to-size DIY materials is the single biggest decision point for most buyers. If you own one of the specific tents supported by the Lotus Belle Insulated Tent Lining, iKamper Insulation Tent or TentBox Cargo 2.0 Thermal Kit, the fitted route removes almost all the guesswork around gaps and coverage. Everyone else is better served combining a wall or roof material like Reflectix Double Reflective Insulation Roll or VEVOR Double Reflective Insulation Roll with a floor-focused product like the Drymate Tent Carpet Mat, since floor and wall heat loss are genuinely separate problems that no single generic product fully solves alone.
Practical Usage Guide: Fitting and Maintaining a Tent Insulation Liner
Fitting starts with measuring, not cutting. Before touching a roll of reflective foil or unpacking a fitted liner, measure your tent’s internal wall height, floor dimensions and any curved sections around poles or vents, since gaps at seams and corners are where most of a liner’s theoretical performance disappears in practice. For DIY reflective rolls like Reflectix or VEVOR, cut panels slightly oversized rather than exact, then trim down once test-fitted — it’s much easier to remove excess material than to patch a gap after the fact.
Securing the liner matters as much as the material itself. Foil-based DIY panels typically need taping at seams with a compatible foil tape rather than standard duct tape, which degrades faster in damp, cold conditions. Fitted liners like the iKamper or TentBox options generally use their own integrated straps or zips, so the main first-30-days mistake is skipping the manufacturer’s specific fitting sequence and forcing panels into place, which can strain seams unnecessarily.
Maintenance is minimal but matters over a season. Wipe down foil surfaces to remove condensation before packing away, since trapped moisture between foil layers can encourage mould over repeated damp storage cycles. Quilted fabric liners like the Lotus Belle lining should be aired out fully between trips rather than stored damp, and any fitted roof-tent liner’s welded seams should be checked periodically for separation, particularly after a season of regular unzipping and resecuring around window openings.
Real-World Scenarios: Which Liner Suits Your Trip?
Picture a family running a small glampsite with several bell tents hosting guests through the shoulder season. Here, the Lotus Belle Insulated Tent Lining makes obvious sense — a fitted, repeatable solution that guests can enjoy without any DIY fiddling, and one that adds genuine ambience alongside warmth, which matters commercially as much as thermally.
Now picture a couple who’ve just bought a roof top tent and are planning their first proper winter trip away from campsites with electric hookups. The iKamper Insulation Tent or TentBox Cargo 2.0 Thermal Kit — whichever matches their specific model — solves the problem precisely, since roof tents have less internal volume to heat and benefit disproportionately from a snug, purpose-fitted liner compared with loosely draped generic material.
Finally, consider a solo hiker or budget-conscious festival camper who wants meaningfully warmer nights without a big spend. Combining the VEVOR Double Reflective Insulation Roll cut to fit their tent’s lower wall panels with the Wind Tour Aluminum Foil Foam Pad underneath their sleeping mat delivers a genuinely noticeable improvement in tent heat retention for a fraction of the cost of any fitted product on this list — proof that DIY tent liner solutions aren’t automatically a compromise, just a different trade-off between effort and price.
How to Choose a Tent Insulation Liner: 6 Expert Criteria
Picking the right tent insulation liner comes down to matching material, fit and application to your specific tent and how cold your trips actually get. Work through this shortlist before buying:
- Check compatibility first. Fitted liners like the iKamper or TentBox options only work with their exact matching tent model — always confirm before ordering.
- Decide floor, wall, or both. Cold rising through the ground is a separate problem from drafts through tent walls, and most single products only solve one.
- Match the material to your season. Quilted fabric liners suit shoulder-season comfort; reflective foil rolls with a stated R-value suit genuinely cold, sub-zero winter camping.
- Factor in installation time. DIY reflective rolls need cutting and taping each trip unless left semi-permanently fitted; purpose-built liners install and pack in minutes.
- Think about ventilation, not just sealing. A liner that blocks all airflow can trap condensation — look for designs with unzippable sections or plan your own ventilation gaps.
- Weigh cost against frequency of use. A £20 DIY roll suits occasional cold trips; a £200 fitted liner earns its keep for anyone camping through winter regularly.
Thermal Tent Liner: How Much Warmth Can You Really Expect?
The honest answer is: it depends heavily on which type of thermal tent liner you choose and how completely it’s fitted, but the manufacturer-quoted figures we found are genuinely informative starting points. The iKamper Insulation Tent, for example, is specifically stated by its manufacturer to improve insulation by around 10°C compared with bare tent walls — a concrete, testable claim rather than vague marketing language. Reflective foil products like Reflectix Double Reflective Insulation Roll publish an R-value of 4.5, a recognised building-insulation metric, though as noted earlier, that figure assumes a well-sealed, gap-free installation rather than a loosely draped sheet.
What most buyers overlook about thermal tent liners generally is that they primarily slow heat loss rather than generate warmth themselves — a liner works alongside your own body heat and any additional layers (sleeping bag rating, extra blankets, or a safely ventilated stove) rather than replacing the need for them. According to the Met Office, the UK’s long-term average winter temperature sits around 4°C, though overnight temperatures regularly drop well below freezing during clear, still conditions — precisely the scenario where a thermal liner earns its keep most, since radiative heat loss into a clear night sky is often the biggest single factor working against you.
Insulated Tent Liner for Winter: What Changes at Sub-Zero Temperatures
Below freezing, the margins for error shrink considerably, and the honest advice changes accordingly. A liner that felt like a nice-to-have for a chilly autumn weekend becomes closer to essential once overnight temperatures regularly dip below zero, because the rate of heat loss through an uninsulated single-layer tent wall accelerates as the temperature differential between inside and outside grows.
For genuinely cold winter trips, combining approaches tends to outperform any single product. Pairing a wall-focused liner — whether a fitted product like the Lotus Belle Insulated Tent Lining or a DIY panel cut from Reflectix Double Reflective Insulation Roll — with a dedicated floor solution like the Drymate Tent Carpet Mat addresses both major heat-loss pathways rather than leaving one uninsulated. It’s also worth being realistic about condensation risk: a well-sealed insulated tent traps more moisture from breath and body heat than a drafty one, so winter camping with any insulation liner fitted means paying closer attention to ventilation than you might in milder conditions, a balance covered in more detail in the safety section below.
Double Wall Tent Insulation: Why Two Layers Beat One
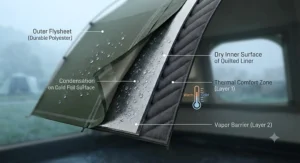
A double-wall tent design — an inner tent plus a separate outer flysheet with an air gap between them — already provides a meaningful insulation advantage over a single-wall tent before you add any liner at all, because that trapped air layer acts as a natural thermal buffer in exactly the way building cavity-wall insulation does. Adding a dedicated insulation liner to a double-wall setup, rather than a single-wall one, generally delivers a bigger overall improvement, since you’re insulating an already-buffered structure rather than fighting direct heat loss through one layer of fabric.
| Feature | Single-Wall Tent + Liner | Double-Wall Tent + Liner |
|---|---|---|
| Base insulation before liner | Minimal, direct heat loss | Natural air-gap buffer already present |
| Condensation management | Higher risk, liner traps more moisture | Better, air gap helps moisture escape outward |
| Overall warmth with liner added | Good improvement | Best overall performance |
| Typical weight | Lighter | Heavier, bulkier to pack |
| Best For | Reflectix, VEVOR DIY rolls on a budget single-wall tent | Roof top tents and bell tents with fitted liners like iKamper or Lotus Belle |
The practical takeaway is that if you’re regularly camping in genuinely cold conditions and shopping for a new tent as well as a liner, prioritising a double-wall design will do more for your overall tent heat retention than liner choice alone — the two work together rather than being separate decisions. For single-wall tent owners, this isn’t a reason to skip insulation; it simply means paying closer attention to ventilation, since the condensation management a double-wall design provides naturally has to be managed manually instead.
DIY Tent Liner: Building Your Own on a Budget
Building a DIY tent liner from scratch is genuinely achievable with either the Reflectix Double Reflective Insulation Roll or the VEVOR Double Reflective Insulation Roll as your base material, and the process is more forgiving than it sounds. Start by measuring each wall panel of your tent separately rather than assuming uniform dimensions, since most tents taper or curve in ways that make a single large sheet impractical to fit cleanly.
Cut panels roughly 5-10% oversized on each edge, then use compatible foil tape to join seams and trim excess once test-fitted inside the tent. For the floor, a full sheet cut to the groundsheet’s dimensions works well beneath a footprint or directly under your sleeping area if covering the whole floor isn’t practical. What most first-time DIY builders overlook is fixing the panels in place — Velcro strips, small bungee loops through existing tent loops, or light adhesive-backed hooks all work better than trying to hold panels up with tape alone, which tends to fail once condensation builds up on the foil surface.
The honest trade-off against a fitted product is time and finish rather than performance — a well-executed DIY liner using a properly rated material like Reflectix can genuinely rival purpose-built options thermally, it just takes an afternoon of careful measuring and cutting rather than an out-of-the-box fit.
Tent Heat Retention: The Science of Where Heat Actually Escapes
Tent heat retention comes down to three main mechanisms working against you simultaneously: conduction (direct heat loss through contact with cold ground or fabric), convection (warm air escaping through gaps and drafts), and radiation (heat radiating outward, particularly upward into a clear night sky). Most tent insulation liners primarily address conduction and convection — foam, foil and quilted fabric all slow direct heat transfer and block draft pathways — while radiative loss is harder to control without a fully reflective, sealed enclosure.
This is exactly why reflective foil products like Reflectix Double Reflective Insulation Roll and VEVOR Double Reflective Insulation Roll work as well as they do for tent applications specifically: the aluminium foil surface reflects radiant heat back toward you rather than just slowing conductive loss the way a plain foam pad would. Ground contact deserves particular attention here, since a body lying directly on a cold groundsheet loses heat far faster through conduction than through any amount of wall insulation — which is exactly why floor-focused products like the Drymate Tent Carpet Mat and Wind Tour Aluminum Foil Foam Pad punch above their price point for the warmth they deliver.
Common Mistakes When Buying or Fitting Tent Insulation
The most frequent mistake is buying a generic insulation roll without checking whether your tent’s actual problem is wall drafts, floor cold, or both — a wall-only liner does nothing for the cold radiating up through the groundsheet, and vice versa. A close second is over-sealing a tent completely without planning for ventilation, which trades one problem (cold) for another (condensation and, in worse cases, mould).
Buyers also commonly underestimate how much fit quality matters compared with raw material specification — a premium R-4.5 reflective roll installed with gaps at every seam will underperform a cheaper material fitted meticulously and taped properly. Finally, skipping compatibility checks on model-specific fitted liners like the iKamper or TentBox options is an easily avoidable mistake; always confirm your exact tent model and edition before ordering a fitted product, since returns on bespoke-fit accessories are often more restrictive than for generic camping gear.
Long-Term Cost and Maintenance
Thinking in cost-per-trip rather than sticker price puts these products in useful perspective. A £150-£250 fitted liner like the iKamper Insulation Tent, used across a decade of regular winter roof-tent trips, works out to a genuinely modest cost per outing, particularly compared with the alternative of investing in a heavier, more expensive winter-rated tent instead. A £30-£70 DIY roll like Reflectix Double Reflective Insulation Roll, meanwhile, can often be reused across multiple seasons if stored dry and handled carefully, though repeated cutting and refitting does gradually wear panel edges.
Maintenance costs are generally low across this category, but not zero. Quilted fabric liners occasionally need re-waterproofing treatment if used regularly in wet conditions, while foil-based DIY panels benefit from periodic foil-tape reapplication as seams loosen with repeated packing and unpacking. Floor-focused products like the Drymate Tent Carpet Mat tend to be the most durable long-term investment relative to price, since they see less flexing and stress than wall or roof liners do across a typical camping season.
Safety First: Condensation, Ventilation and Fire Risk
Insulating a tent changes its airflow characteristics, and that has genuine safety implications worth taking seriously rather than treating as an afterthought. A well-insulated, well-sealed tent traps more moisture from breathing and body heat, increasing condensation risk, so any liner installation should leave a deliberate ventilation gap rather than sealing every possible draft. According to the Camping and Caravanning Club’s safety advice, fuel-burning devices such as stoves, heaters and barbecues should never be used inside a tent regardless of how well insulated it is, since carbon monoxide risk and fire risk both increase in an enclosed, heat-retaining space rather than decrease.
Cold-weather camping also carries its own separate health risk worth flagging honestly: even with a well-insulated tent, prolonged exposure to cold conditions can lead to hypothermia if clothing, sleeping systems and insulation aren’t all working together. The NHS’s guidance on hypothermia is worth reviewing before any serious winter camping trip, particularly around recognising early symptoms like persistent shivering or confusion, since a tent liner reduces risk but doesn’t eliminate the need for appropriate clothing and sleeping bag ratings for the conditions you’re heading into.
Frequently Asked Questions
❓ Does a tent insulation liner really make a noticeable difference?
❓ What's the cheapest way to insulate a tent for winter?
❓ Can I use a tent insulation liner on any tent?
❓ Does insulating my tent cause condensation problems?
❓ Is floor insulation or wall insulation more important?
Conclusion
A tent insulation liner is one of those upgrades that sounds like a nice-to-have right up until the first genuinely cold night, at which point it becomes the difference between a good trip and a miserable one. Across this list, the honest recommendation splits by situation: the iKamper Insulation Tent or TentBox Cargo 2.0 Thermal Kit for roof tent owners who want a precise, tested fit; the Lotus Belle Insulated Tent Lining for bell tent and glamping setups where finish matters as much as warmth; and the Reflectix Double Reflective Insulation Roll or VEVOR Double Reflective Insulation Roll for anyone building their own solution on a budget.
Whichever route you take, remember that floor insulation and wall insulation solve genuinely different problems, and that ventilation matters just as much as sealing up every draft. Pairing the right liner type with realistic expectations about what it can and can’t do — and taking cold-weather safety seriously alongside it — is what actually separates a warm night’s sleep from a cold, damp one.
Recommended for You
- Winter Camping Insulation: 7 Proven Picks for 2026
- Clip On Fan for Tent: 7 Best Picks to Beat the Heat 2026
- Rechargeable tent fan UK 2026: 7 Best Picks That Won’t Die at 3am
Disclaimer: This article contains affiliate links. As an Amazon Associate, I earn from qualifying purchases. If you purchase products through these links, we may earn a small commission at no additional cost to you.
✨ Found this helpful? Share it with your friends! 💬🤗
